
This past week I have been tossing, organizing and mainstreaming our life a little better. It all started as a few simple ways to follow Montessori principles for Lauren. It took on a life of its own. So I made my way through the house room by room until finally it couldn't be helped anymore. The master bedroom was up.
Now before I share any pictures I have to share this, when I was a kid my mom would always say shaking her head "You have champagne taste with root beer money.". It's true my taste leans a bit on the spendy side which in this root beer house presents a bit of a challenge. We are self-employed and are heading into the slow season, right now we have a root but no beer if you know what I mean. My goal was to makeover the room with as little purchasing as possible. It turned out pretty well for only $35 bucks!
Here is the cost break down:
Vinyl sayings: $13
Craft Paint: $9
Paint supplies: $8
Canvas: $2.50
Print shop/pictures: $3
That's it, that is all I spent on the entire room. How is that for repurposing and using what you have on hand.

{My inspiration fabrics. Last year my Grandma and Aunt sent me lovely boxes filled with fabric. These were included in the box from my aunt. I loved this blue fabric for many reasons but especially so because it had the red in it. After spending time on Pinterest I have come to see that I love a cool color scheme in the bedroom as long as there is red! Score with this fabric!}

{Over the bed I hung a canopy thing (what are these called!?) made out of 1/2 a king sized sheet. I found the art on Pinterest and had it printed (wrong) at the copy store. We built the bedside tables (which are NOT finished yet) out of scrap wood and a few balusters we had from the remodel that never happened.}

{The curtains are (the other) 1/2 king sheet and 1/2 a queen sheet. The king sheet was in Grandmas box last year and I loved the brown color. It has a bit of sheen to it and a high thread count making it nice and soft. The curtains are probably the spot I am the least fond of. For now though they work just fine.}
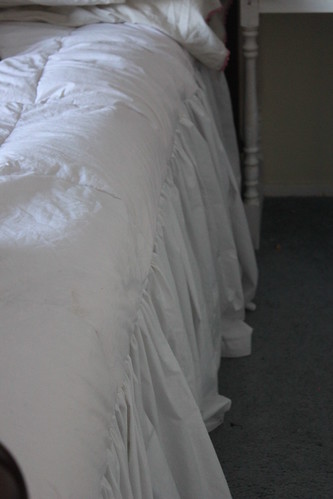
{The comforter. We were given this down comforter years ago for Christmas. It's a full-sized comforter and our bed is a queen. You see the problem? It has rarely been used in 10 years and every time it is I remember why we don't use it. It was obviously to small, barely covering the top of the mattress. I was determined to use it though. I cut up a couple of white sheets, did a baste stitch to gather the material, and sewed it to the comforter, creating this ruffly extension. It works perfect! The comforter stays on, there is plenty of length, and it gives a bit of softness to the room}

{The picture was is a work in progress. I have more frames that need to go up as well as pictures that I ordered on from Shutterfly that need to arrive. I found the whopping 10 pictures of Dean and I together over the last 12 years and had them printed in black and white. These will go in the variety of frames I had lying around. Three frames have vinyl sayings on them that are simple and sweet.}

{Since the bed side tables were made out of scrap wood, we had to piece them together. The tops are made of two widths and types of wood. I knew I would have to paint them to hide the very ugly imperfections. I choose to do a faux granite paint job. I picked a cream color for the base and 5 brown tones that worked well together. Then I took a sea sponge and went to town layering. Both night stands took about 30 minutes to paint. I then sprayed them with a glossy sealer. Next step, paint the base.}

{Our dresser has been calling for a makeover for a long time now. When I decided to paint the night stands I decided to tie the dresser in. I did the same faux painting on the dresser top. The finish on the dresser had yellowed over time and caused the whole thing to have a military green look to it. Very ugly. So I rubbed some Chocolate Cherry paint over it with the sea sponge and it made a drastic difference. I will put a good coat of paint on later.}

We don't spend a lot of time in our room but I still wanted it to reflect us a bit more than a tornado zone. It still isn't up to my champagne taste but it is 100% better than it was. Last night as we crawled into bed Dean mentioned that the most depressing room in the house has now become one of the most comfortable rooms. Now that is a compliment.
Find a little spot in your house and see how you can tweak it to make it just a bit more beautiful or comfortable. It's amazing the change it can have on your state of mind.
Have a beautiful week.
This post part of Frugal Days, Sustainable Ways
9 comments:
Beautiful job! I recognized those fabrics right away. The tone on tone floral is what I had a chair in my bedroom upholstered in. The teal floral that you love is from a huge master bedroom re-do that I did for someone. FYI it retails at 45.00 per yard! It's called Sasche/Lapis. You're a talented woman!
Good for you! It is lovely!
This post is so informative and inspirational. I think my subscribers would really enjoy reading this. I would love for you to come share it at Frugal Days, Sustainable Ways on Frugally Sustainable today. And, I really hope that you will put Frugal Days, Sustainable Ways on your list of carnivals to visit and link to each Wednesday! Here’s the link: http://frugallysustainable.blogspot.com/2011/11/frugal-days-sustainable-ways-1.html
Warmly,
Andrea @ Frugally Sustainable
Here's the link: http://www.frugallysustainable.com
You made it! I'm really so honored:) Thank you so very much for linking up to Frugal Days, Sustainable Ways:) I'm so happy to "meet" you! I am totally loving your blog and your posts! I really hope you make Frugal Days, Sustainable Ways a part of your Wednesdays! And keep the great posts comin'
Very sincerely,
Andrea @ Frugally Sustainable
Andrea,
Thanks so much for letting me know about your carnival. I will plan on being there every Wednesday. :)
It is good to "meet" you to. I love your blog!
Beautiful! I love using things I have to make something new too!
hugs
Sweetie
Stopping by from Company Girl Coffee
Love the makeover! I think our bedroom needs one...the baby crib needs to go since the little one has moved in with her big sis for a few months now. =p
Great job. Very charming. Goes to show what you can do with a little money and a lot of creativity.
Beautiful transformation. . .thank you for reminding me that we need to work on our bedrooms once in awhile. . .that they shouldn't always be the last to do or a dumping ground for everything that doesn't have a home. You've given me some inspiration!
Post a Comment